From zero to fully protected Nimble storage on Proxmox
Most Proxmox storage types either present a LUN you already carved (kernel iSCSI) or a file share (NFS, Ceph, ZFS on local disks). A smaller set of vendor plugins talk to an array API so Proxmox can create volumes and snapshots for you. This post covers one of those: pve-nimble-plugin — a Perl storage backend for HPE Nimble over iSCSI, with the Nimble REST API on port 5392.
In one sentence: Proxmox creates and owns Nimble volumes as VM disks, maps them over iSCSI (with optional multipath), and uses array snapshots for VM snapshot, rollback, and clone — including pulling snapshots taken only on the array into the VM’s snapshot list so you can roll back from the UI.

Array-created snapshots appear in the normal Proxmox snapshot list. Descriptions show the volume and snapshot name from Nimble (schedule or collection names), not a generic “imported” placeholder.
What this plugin does that stock types don’t
These are practical differentiators — not a ranking of “best storage,” just capabilities that are uncommon in the Proxmox ecosystem.
-
Per-VM-disk volumes on the array Each Proxmox disk becomes its own Nimble volume with a predictable name (
vm-<id>-disk-…), not a shared datastore you subdivide by hand. That maps cleanly to per-disk snapshot and restore semantics on the array. -
Two-way snapshot story You get PVE → Nimble snapshots for normal VM operations, and a path back: schedules, collections, or manual snaps taken on the array can show up under VM → Snapshots after sync. Few integrations both drive the array and reconcile foreign snapshots into the VM config.
-
Firmware-tolerant snapshot metadata Some Nimble builds return sparse rows from the snapshot list API (missing
vol_name,creation_time, etc.). The plugin fills identity from context and hydrates missing fields from detail GETs without letting API nulls clobber good data — the kind of array-quirk work generic iSCSI doesn’t do. -
Activate-time iSCSI discovery wired to the array Default auto discovery walks Nimble subnets for authoritative discovery IPs, merges optional extra portals, and falls back to live
iscsiadmsession hints. Toggle it off and manageiscsiadmyourself if you prefer. -
Initiator groups and ACLs as part of the workflow Optional named initiator group, or automatic
pve-<nodename>from the node IQN, plus access control records so the right IQN sees the right volume — aligned with how Nimble expects iSCSI to work. -
Multipath ownership WWID → alias snippets under
/etc/multipath/conf.d/nimble-<storeid>.conf, with a persisted WWID cache under/etc/pve/priv/nimble/, so aliases survive map / free / activate without hand-editing multipath for every volume. -
Move disk / delete source teardown The same disconnect → offline → purge snaps → DELETE discipline used for rollback prep applies during storage migration with delete source, including retries when the array returns 409 errors.
-
Packaging and operations Debian package with
postinstrestartingpvedaemon,pvestatd,pveproxy,pvescheduler— intentionally notpve-cluster, to avoid longaptstalls. Scripted install supports single node or all cluster nodes over SSH.
What you’re building
When you’re done, you should be able to:
- Create VM disks that are individual Nimble volumes, not slices of one big LUN — so array snapshot and replication semantics map cleanly to real workloads.
- Use Proxmox VM snapshots (backed by the array) and rollback when something goes wrong, without a separate ritual per host.
- Grow disks from Proxmox and extend inside the guest.
- Optionally run multipath so dual fabrics or dual NICs collapse to one device per LUN.
- Run it all in a cluster: storage config syncs; the plugin still has to exist on every node.
Prerequisites (sanity check)
You’ll want Proxmox VE 8.2+ (single node or cluster), a Nimble with REST API reachable on port 5392, and at least one iSCSI subnet with a discovery IP your nodes can reach. Your API user needs to be allowed to create volumes, initiator groups, and access control records. Sudo on each node goes without saying.
Plan the network (two kinds of “reachable”)
Think in two lanes:
- Management — Proxmox needs to hit the Nimble at something like
https://<mgmt_ip>:5392for the API. - iSCSI — Each node needs a path to whatever discovery IPs the Nimble advertises for iSCSI. That might be one VLAN or two; if you have two paths (e.g. 10.0.1.x and 10.0.2.x), you’re also setting yourself up for multipath later.
Prep the Nimble array
In the Nimble UI or your runbook: confirm REST API is enabled on the management interface, and that you have at least one iSCSI-enabled subnet (type data or mgmt,data) with a discovery IP. The plugin’s default auto_iscsi_discovery uses those when storage activates on each node (you can turn it off with no / 0 if you prefer full manual discovery).
Quick proof from any Proxmox node that the API path is real:
curl -sk -X POST "https://<NIMBLE_MGMT_IP>:5392/v1/tokens" \
  -H "Content-Type: application/json" \
  -d '{"data":{"username":"<user>","password":"<password>"}}'
You want JSON with data.session_token. If that’s there, the control plane is ready.
Install Plugin
The same script can install the plugin on a single node or on a whole cluster: run it locally on one host, or pass --all-nodes so it installs on every cluster member over SSH. Use the single-node commands below for one machine, or the --all-nodes block when you want the whole cluster covered.
In a cluster, each node that will use Nimble storage still needs the package on that host; storage definitions sync via corosync, but the plugin does not.
This guide assumes you use the install script from the repo. In short, it: checks you’re on a real Proxmox VE host; adds the project APT repo (or you can pass --version to pull a specific .deb from GitHub instead); runs apt update and installs open-iscsi plus libpve-storage-nimble-perl (iSCSI stack + initiator IQN on the box, plus the storage plugin); then restarts the usual PVE daemons (pvedaemon, pveproxy, pvestatd, scheduler, HA if present) so the new backend is picked up.
# Single node
curl -fsSL https://raw.githubusercontent.com/brngates98/pve-nimble-plugin/main/scripts/install-pve-nimble-plugin.sh | sudo bash

# Whole cluster — dry-run first, then go
curl -fsSL https://raw.githubusercontent.com/brngates98/pve-nimble-plugin/main/scripts/install-pve-nimble-plugin.sh | sudo bash -s -- --all-nodes --dry-run
curl -fsSL https://raw.githubusercontent.com/brngates98/pve-nimble-plugin/main/scripts/install-pve-nimble-plugin.sh | sudo bash -s -- --all-nodes
Use --yes if you want non-interactive confirmation, --version X.Y.Z to pin a release. Confirm the package landed with:
dpkg -l | grep libpve-storage-nimble-perlMultipath (optional but recommended once you have dual paths)
If you only have one path to the array, you can skip this. If you have two paths (or more), install multipath tools and blacklist everything except Nimble so you don’t multipath local disks by accident.
sudo apt install multipath-tools
sudo systemctl enable multipathd
sudo systemctl start multipathd
Then put something like this in /etc/multipath.conf — Nimble-only: blacklist everything by default, then allow Nimble devices and tune them for ALUA (same example as the plugin README):
defaults {
    user_friendly_names yes
    find_multipaths     no
}
blacklist {
    devnode "^(ram|raw|loop|fd|md|dm-|sr|scd|st)[0-9]*"
    devnode "^hd[a-z]"
    device { vendor ".*" product ".*" }
}
blacklist_exceptions {
    device { vendor "Nimble" product "Server" }
}
devices {
    device {
        vendor               "Nimble"
        product              "Server"
        path_grouping_policy group_by_prio
        prio                 "alua"
        hardware_handler     "1 alua"
        path_selector        "service-time 0"
        path_checker         tur
        no_path_retry        30
        failback             immediate
        fast_io_fail_tmo     5
        dev_loss_tmo         infinity
    }
}
sudo multipathd reconfigure
sudo multipath -llOther Proxmox nodes in the cluster: set up multipath-tools on each node the same way (apt install, enable multipathd). After you’re happy with /etc/multipath.conf on one host, copy it to the others and reload multipath there:
scp /etc/multipath.conf root@<pve2-hostname-or-ip>:/etc/multipath.conf
scp /etc/multipath.conf root@<pve3-hostname-or-ip>:/etc/multipath.conf
ssh root@<pve2-hostname-or-ip> 'multipathd reconfigure && multipath -ll'
ssh root@<pve3-hostname-or-ip> 'multipathd reconfigure && multipath -ll'Add Nimble storage to Proxmox
Run pvesm add from any node — storage definitions sync across the cluster. Pick a storage ID (the name Proxmox shows) that you’ll recognize, e.g. nimble-prod.
Quick setup
Minimal example: Nimble management URL, API user, password, and disk images as content. The plugin can create an initiator group named pve-<nodename> if you don’t name one.
pvesm add nimble nimble-prod \
  --address https://<NIMBLE_MGMT_IP_OR_FQDN> \
  --username <API_USER> \
  --password '<API_PASSWORD>' \
  --content images
More pvesm examples (optional)
Existing initiator group on the array
If you already have an initiator group in Nimble (instead of letting the plugin create pve-<nodename>):
pvesm add nimble nimble-prod \
  --address https://<NIMBLE_MGMT_IP_OR_FQDN> \
  --username <API_USER> \
  --password '<API_PASSWORD>' \
  --initiator_group <GROUP_NAME_ON_NIMBLE> \
  --content images
Default pool and volume collection
Put new volumes in a specific pool and add them to a volume collection (useful for Nimble-side snapshot schedules and grouping):
pvesm add nimble nimble-prod \
  --address https://<NIMBLE_MGMT_IP_OR_FQDN> \
  --username <API_USER> \
  --password '<API_PASSWORD>' \
  --pool_name <POOL_NAME> \
  --volume_collection <COLLECTION_NAME> \
  --content images
Prefix for volume names on the array
Prefix every volume name Nimble sees (helps when multiple environments share one array):
pvesm add nimble nimble-prod \
  --address https://<NIMBLE_MGMT_IP_OR_FQDN> \
  --username <API_USER> \
  --password '<API_PASSWORD>' \
  --vnprefix <PREFIX_> \
  --content images
Extra discovery IPs or disable auto discovery
By default the plugin runs iSCSI discovery when storage activates and uses subnets from the Nimble API. If you need additional portals beyond what the API returns:
pvesm add nimble nimble-prod \
  --address https://<NIMBLE_MGMT_IP_OR_FQDN> \
  --username <API_USER> \
  --password '<API_PASSWORD>' \
  --iscsi_discovery_ips <IP1>,<IP2> \
  --content images
To turn off activate-time discovery and drive iSCSI yourself (each node):
pvesm add nimble nimble-prod \
  --address https://<NIMBLE_MGMT_IP_OR_FQDN> \
  --username <API_USER> \
  --password '<API_PASSWORD>' \
  --auto_iscsi_discovery 0 \
  --content images
Then on each node, discovery and login manually:
sudo iscsiadm -m discovery -t sendtargets -p <NIMBLE_DISCOVERY_IP>
sudo iscsiadm -m node --op update -n node.startup -v automatic
sudo iscsiadm -m node --login
Verify TLS to the Nimble API
If the array presents a certificate your nodes trust, you can enable SSL verification (default is off for common lab/self-signed setups):
pvesm add nimble nimble-prod \
  --address https://<NIMBLE_MGMT_IP_OR_FQDN> \
  --username <API_USER> \
  --password '<API_PASSWORD>' \
  --check_ssl yes \
  --content images
Debug logging (troubleshooting)
pvesm add nimble nimble-prod \
  --address https://<NIMBLE_MGMT_IP_OR_FQDN> \
  --username <API_USER> \
  --password '<API_PASSWORD>' \
  --debug 1 \
  --content images
Levels: 0 off, 1 basic, 2 verbose, 3 trace. You can also change later with pvesm set <storage_id> --debug 1.
Nimble storage options (reference)
| Option | Role |
|---|---|
address | Nimble management URL (https://host — API port 5392 is used by default). |
username / password | REST API credentials. Password is stored in cluster config / priv files like other PVE backends. |
content | What Proxmox may store here; images is typical for VM disks. |
initiator_group | Optional. Use an existing Nimble initiator group name; if omitted, the plugin can create pve-<nodename>. |
pool_name | Optional. Default Nimble pool for new volumes. |
volume_collection | Optional. Add new volumes to this collection (e.g. for array snapshot policies). |
vnprefix | Optional. Prefix for volume names on the array. |
auto_iscsi_discovery | Default on. Set 0 or no to skip activate-time discovery (you manage iscsiadm yourself). |
iscsi_discovery_ips | Optional. Extra comma-separated discovery IPs if the API path isn’t enough. |
check_ssl | Default no. Set yes to verify TLS to the Nimble API. |
token_ttl | Optional. Session token cache lifetime in seconds (default 3600). |
debug | Optional. 0–3 — plugin log verbosity for troubleshooting. |
After the store exists, use pvesm set <storage_id> … to adjust most options without removing storage.
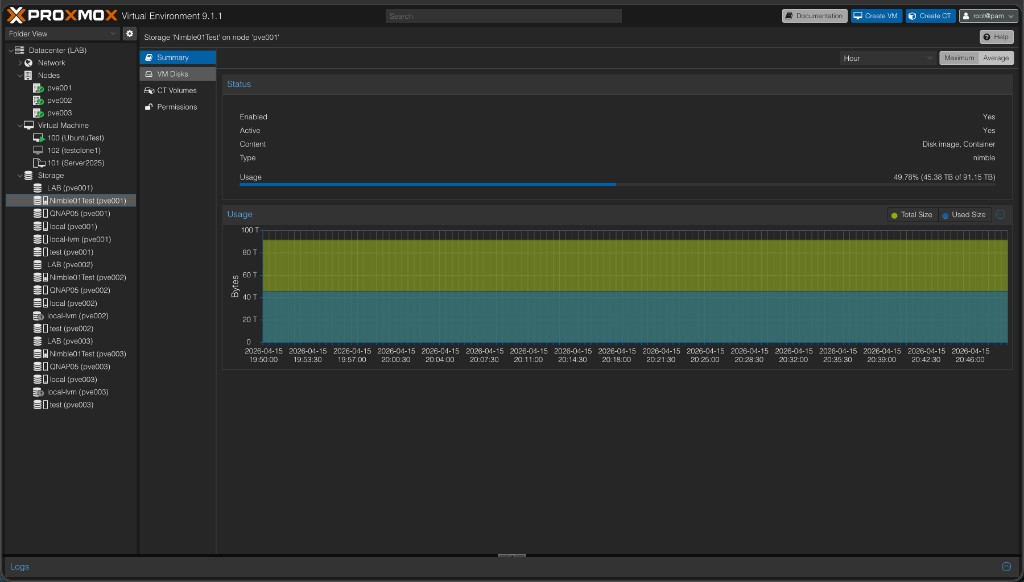
Verify in the UI
Open Datacenter → Storage, click your Nimble store, and check Summary for Usage and Free from the pool. If you’re using auto discovery, touch the storage from another node (browse or create a VM there) so that node activates storage and runs discovery too.
Create a VM disk and exercise resize
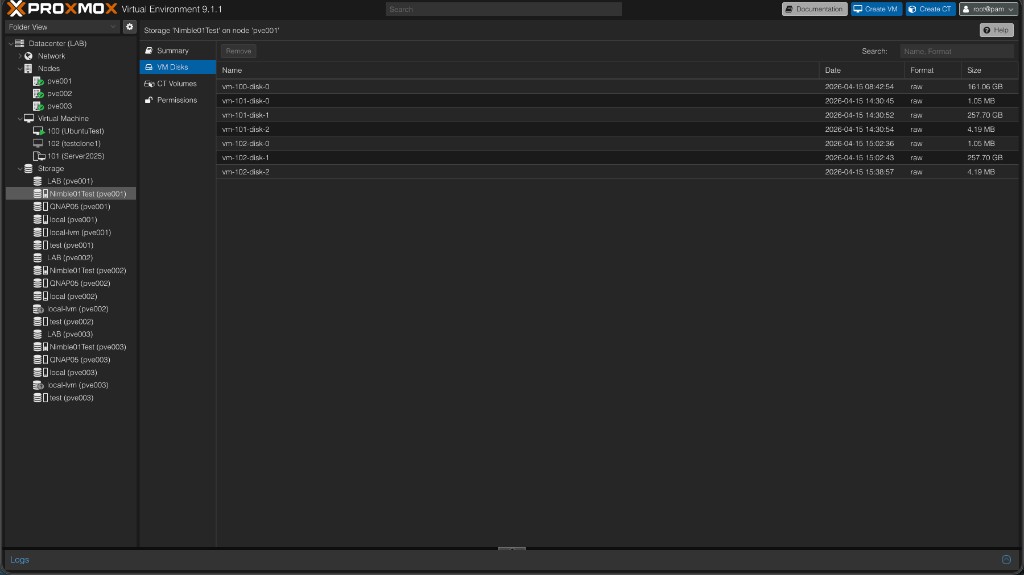
Create or edit a VM, Hardware → Add → Hard disk, pick your Nimble storage, set a size, add. Boot the guest, confirm the disk, then resize from Proxmox and grow the partition/filesystem inside the guest. That confirms create + map + resize end to end.
The VM Disks view shows each Proxmox disk as its own Nimble volume — you can see individual volumes per VM with their sizes and raw format confirmed on the array side.
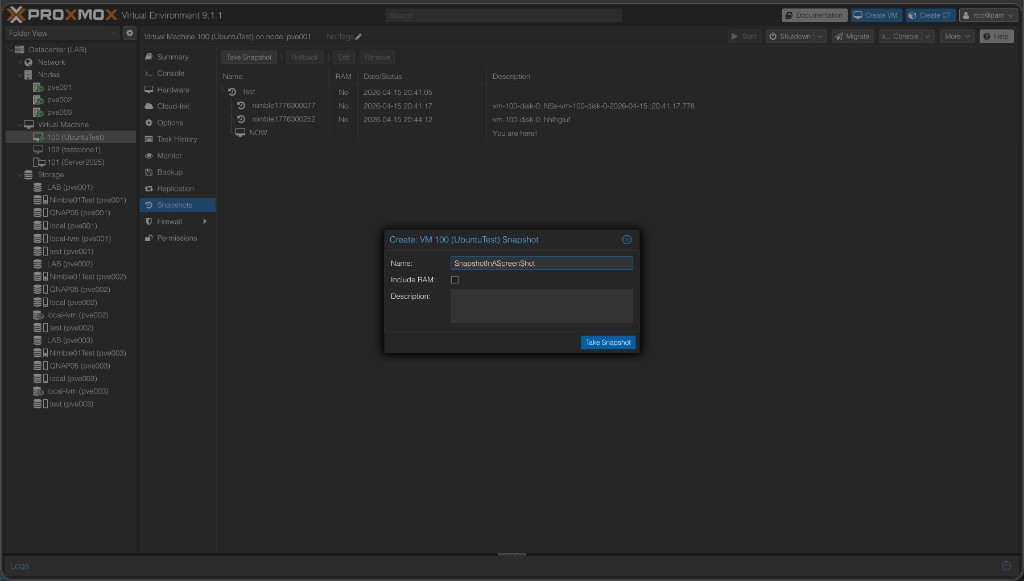
Snapshots and rollback (this is the “fully protected” moment)
With a VM using a Nimble disk:
- Take a VM snapshot (VM → Snapshot).
- Change something obvious in the guest (create a file, break something harmless).
- Rollback to the snapshot — the guest should match the snapshot.
Optionally clone from a snapshot to spawn a new VM from that point. After this, you’ve proven array-backed snapshots through Proxmox, not just “a disk that mounts.”
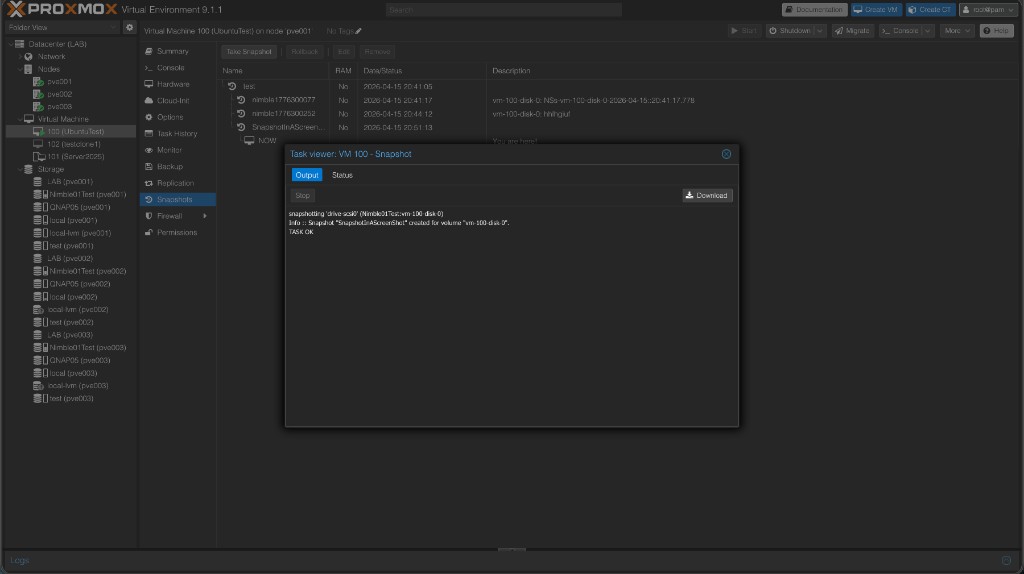
The snapshot task runs against the Nimble API and reports back directly in Proxmox’s task viewer:
Restore: Proxmox rollback vs Nimble-only snapshots
Not every useful snapshot shows up under VM → Snapshots in Proxmox. If you took the snapshot there, rollback is built in. If the snapshot exists only on the array (protection schedule, manual snapshot in Nimble, etc.), you recover from Nimble instead.
- You have a Proxmox VM snapshot — use VM → Snapshots → Rollback to put the VM back to that point. That updates the underlying Nimble volumes in place for every disk that was part of that snapshot.
- You only have a Nimble snapshot — clone it to a new volume (safe; attach as an extra disk for recovery) or restore in place on the live volume (destructive; shut the VM down first). Do that in the Nimble UI or via the REST API (e.g.
POST …/volumes/<id>/actions/restorewithbase_snap_id).
One disk vs whole VM: Proxmox rollback is VM-wide. To rewind a single disk to a point in time, clone or restore that volume on the array, or clone the VM snapshot and move only the disk you need.
If something breaks
| What you see | Where to look first |
|---|---|
| Storage missing on a node | Plugin installed on every node? Restart pvedaemon after install. |
| Can’t get discovery IPs | At least one iSCSI subnet with a discovery IP on the array. |
| Initiator / ACL errors | Installer pulls in open-iscsi; if errors persist, check /etc/iscsi/initiatorname.iscsi (see README). |
| No LUN after creating a disk | iscsiadm -m session, rescan, firewall to discovery IPs. |
| Multipath not grouping | multipath.conf exceptions + multipathd reconfigure. |
More detail, debug flags, and NIMBLE_DEBUG live in the README troubleshooting.